F MAGAZINE
Documentation & Usage
- Version: 5.1
- Created by: ThemeRuby
- Demo URL: https://demo.themeruby.com/fmagazine
01. Getting Started
Theme Requirements
In order to proceed with the theme installation, you need to make sure you have the latest version of WordPress (3.5+) on your self-hosted site.
Theme Installation
- Log into your WP Admin and browse for Appearance → Themes.
- Now navigate to the secondary tab: Install Themes and click the Upload link option.
- Follow the instructions by choosing the file "fmagazine.zip", located in the archive which you have downloaded from ThemeForest and click "Install Now" button.
- Click Activate link, once the upload has finished, and you are ready for the next steps.
Demo Content Import (optional)
1. Imported data
The theme comes with a .xml file containing demo content you can import into your WordPress site. This will help you get started, in case you are running on a fresh WP installation with no content at all. To upload the demo content follow this steps:
- Navigate to Tools → Import.
- Click on "WordPress" link (if the Importer plugin is not installed, install it now).
- Select the demo.xml file located in the archive which you have downloaded from ThemeForest and click "Upload file and import" button.
- Your are done! Now your site is populated with demo content.
1. Imported Theme options
- Select the theme-option.json file located in the archive which you have downloaded from ThemeForest. Open this file with TXT editor, select all text and then copy it.
- Navigation to Theme options → Imported/Exported. Click Imported from file. and then paste text you have just copied. And then, click import..
3. Imported Widget
plugins we recommend:
- Envato Wordpress Toolkit - this plugin will let you know when our theme is updated. Install the plugin and enter your Envato Marketplace username & and your API key.
Contact Form 7 - Contact Form 7 can manage multiple contact forms, plus you can customize the form and the mail contents flexibly with simple markup
Force Regenerate Thumbnails - Usefull if your site already have a lot of content and images. Allows you to delete all old images size and regenerate the thumbnails for your image attachments.
MailChimp for WordPress - MailChimp for WordPress, the absolute best. Add subscribers to your MailChimp lists from your WordPress site, with ease.
02. Homepage Setup
Step 1: Prepare the page
- Navigate to: Pages → Add New.
- Enter the title for this page: Homepage or Home, whatever you like.
- On the right side of your screen find the "Page Attributes" box and select "Page Composer" in the "Template" dropdown
Step 2: Page Composer

After selecting the "Page Composer" template you see the Page Composer interface which easily lets you create the homepage layout. To get started click on the "Choose Section" button and you will see all the available sections you can add to your homepage.
- Full Width Section - Display content without sidebar.
- Content Section -Display content with sidebar.
After selecting the section. click on the "ADD BLOCK" button and you will see all the available block in this section you can add to your homepage.
- Block Big Carousel - Display carousel slider posts (big thumbnail).
- Block Small Carousel - Display carousel slider posts (small thumbnail).
- Grid Thumb with Excerpt - Display posts with thumnail, title and posts Excerpt.
- Grid Thumb with Title - Display posts with thumnail, title.
- Static Image - Add static image with or without a link, add title and sub title. When you want to use this section for banner, input "IMAGE LINK" will be added to the link tag.
- Code Box - Add video embde code (<iframe...), banner JavaScript or Google Ads code.
- List Posts 3 Columns Layout - Show list posts 3 columns layout with thumbnail, title and excerpt.
- List Posts 2 Columns Layout - Show list posts 2 columns layout with thumbnail, title and excerpt.
- List Posts Classic Blog - Show List Posts Classic Blog layout.
Step 3: Front Page Displays
Now you have to tell WordPress wich page is your site homepage.
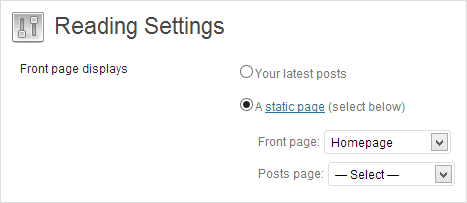
- Navigate to: Settings → Reading.
- In a "Front Page Displays" select "A static page (select below)"
- In a "Front page:" dropdown select your "Homepage" page.
- You are done! Now you have your Homepage.
03. Creating Categories
To start creating categories navigate to Posts → Categories. First do all the usuall stuff: type the category name and slug
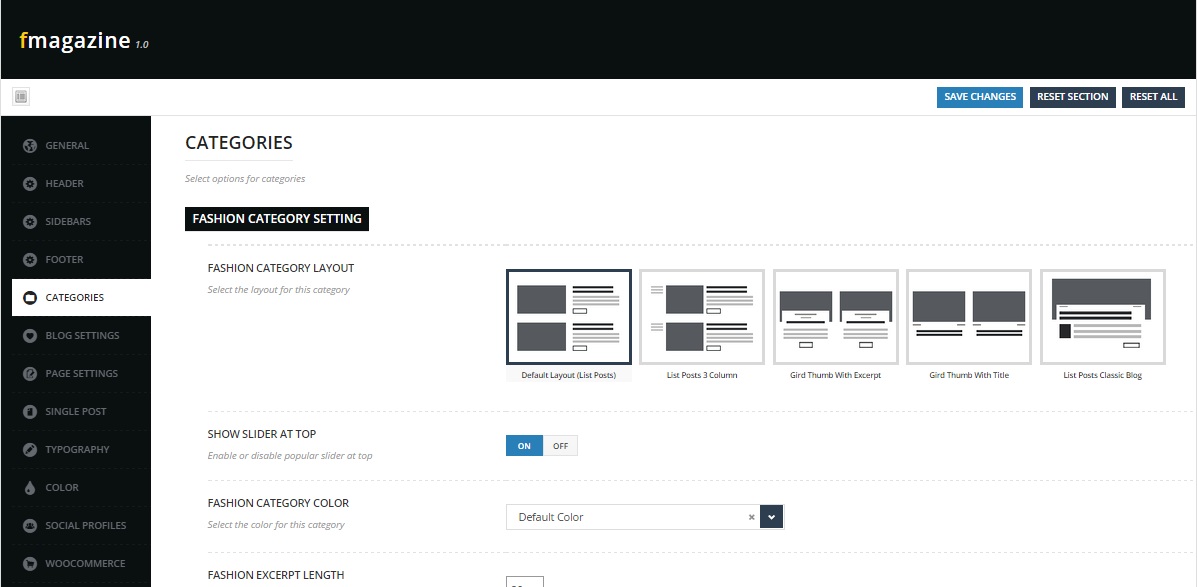
To get started navigate to Theme Options → Categories
- 1. Category Layout - Select the layout for this category.
- 2. Category Color - You Can select custom color for category.
- 3. Excerpt Lenght -How many words in posts exceprt in category.
- 4. Category Sidebar - Select custom sidebar for category.
- 5. Sidebar Position - Select sidebar position for this category. This option will override default sidebar position setting.
04. Adding New Post
To create a new post navigate to Posts → Add New.
Post Formats
We enabled four WordPress native post formats. Each format has it's own custom fields (except Standard) for simple content making.
- Standard - uses only the default fields.
- Video - when you select this format a custom "Video Post" field will apper below the editor. Paste here the URL of the page with the video you want to add. Most of the video hosting sites are supported such as Vimeo and YouTube.
- Gallery - when you select this format a custom "Gallery Post" box will apper below the editor. Adding the gallery:
- Click the "Add Image". The images manager will appear.
- Upload images you want to be in the galley
- Hold down the Ctrl key and select the images with your mouse. Click the "Select" button at the bottom. Now your images are added to the gallery
You can drag & drop the images to rearrange the order.To remove the image from the gallery, place the mouse over the image and now you see the remove icon on the top right corner of the image. If you want to add another image click on "Add Image" button again. - Audio - when you select this format a custom "Audio Post" field will apper below the editor. Paste here the URL of the page with the audio track you want to add from Sound Cloud.
Post Options
By using options in this box you can deside what happens in single post and add this post to different locations of your site.
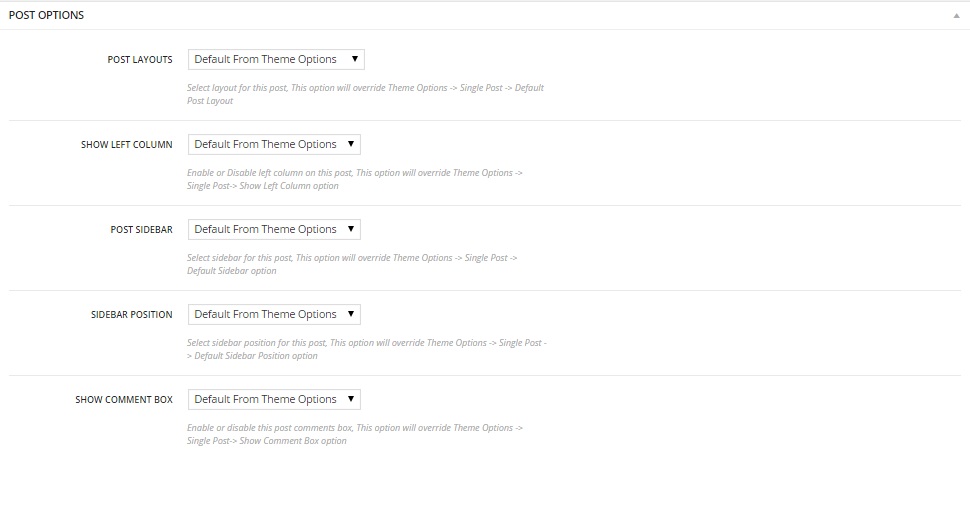
- 1. Post Layouts - Select layout for post. this option will override default layout in single options.
- 2. Show Left Column - Enable or disable left column for this post.
- 3. Post Sidebar - Select custom sidebar for this post. this option will override default post sidebar in single options.
- 4. Show Comment Box - Enable or disable comment box of post.
- 5. Post Resource - You can add resource link of this post. This option is unlimited added.
Post media
WordPress Gallery
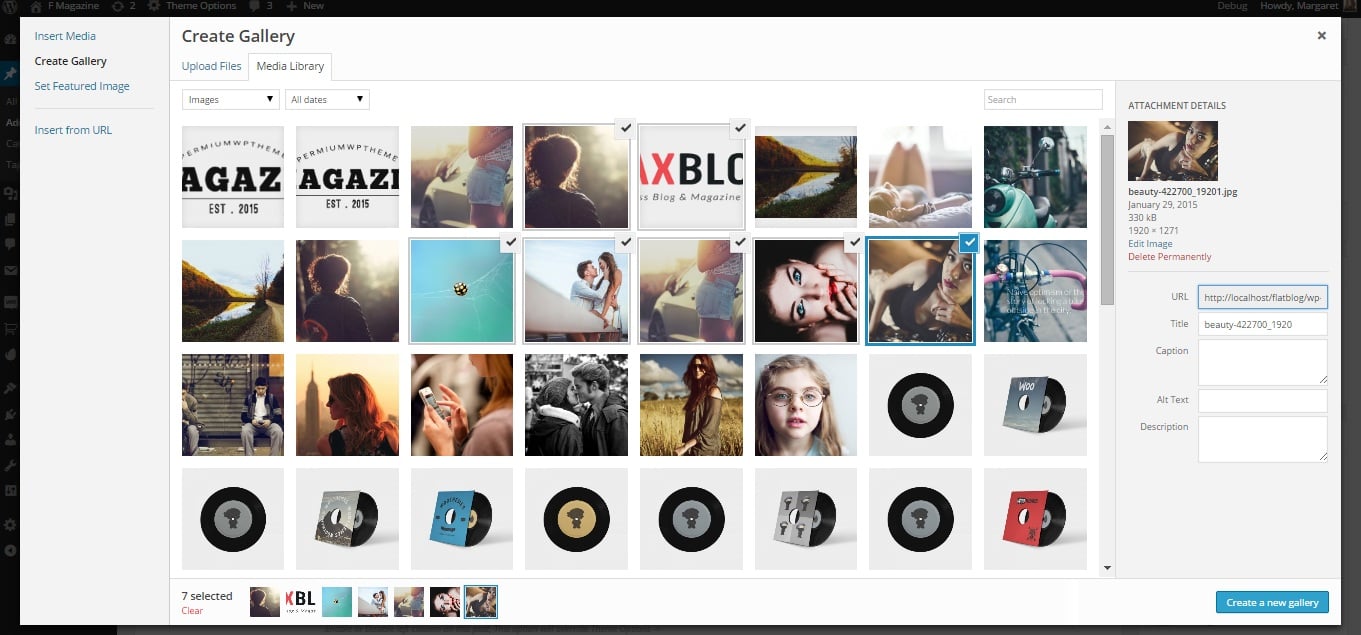
To create a WordPress gallery follow this steps:
- Add New or Edit existing Post or page.
- Click on the "Add Media" button just the above the editor. A media window will open.
- Click on "Create Gallery" link on the left.
- Upload new images or if you allready have images in your media library click on every image you want to add to the gallery.
- Click on the "Create a new gallery" button at the bottom right of the window.
- Optional: add captions to each of the images.
- Click on the "Insert gallery" button at the bottom right of the window.
The theme will auto created layout of gallery with popup image when click.

05. Creating Static Pages
Static page can be created with sidebar or full width (without the sidebar). You don't have to select any templates to configure the page.
To start creating the pages navigate to Pages → Add New. Leave the "Default Template" in "Template" dropdown.
Locate "Page Options" box on the right side of the page.
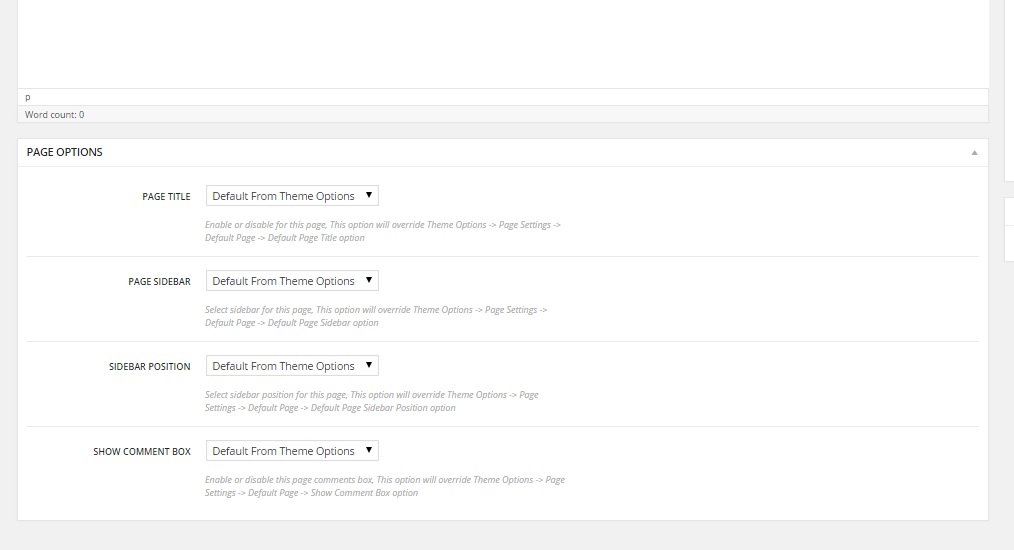
1. Page Title - Enable or disable page title for this page.
2. Page Sidebar - Select the sidebar for this page.
3. Sidebar Position - Select the "None" option to use the page as full width page.
4. Show Comment Box - Enable or disable comment box on this page.
07. Navigation
Setting Up New Menus
Follow the next steps to define menus for each of the theme's menu locations. In each menu, you can add as many items you need.
- Navigate to Appearance → Menus and click Add Menu.
- Give it a name, add links and click "Save Menu" button.
- Click on Manage Locations tab (WP 3.6), assign a Menu Location for your newly created menu, by selecting it for the preferred Theme Location.
Menu Location
The theme comes with 3 custom menu locations: Main Menu (with mega menu feature), Top Menu and a Bottom Menu. You must define your menu items for each menu location, once you have created your pages.
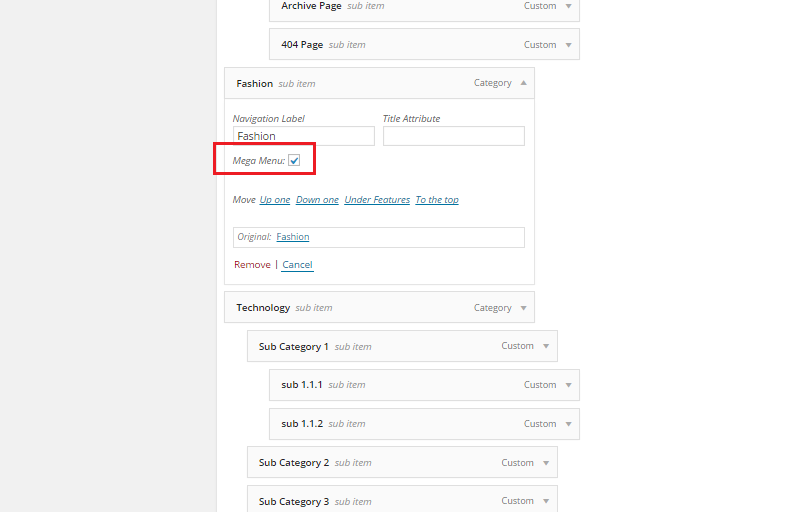
Main Menu "Mega Menu" Feature
Each link (category) in the main menu can have a child dropdown menu which can be displayed in 3 different ways.
- Mega Menu - checked to create MEGA menu.
08. Site Authors
Author Avatar
To make your author avatar to appear on your site, register at gravatar.com with the same email you registered at your site.
Social Profiles
We added some extra fields to the user profile page to extend the information about the authors of your site. The added fields are: Social Profiles and a Custom Avatar upload instead of the default WP gravatar.
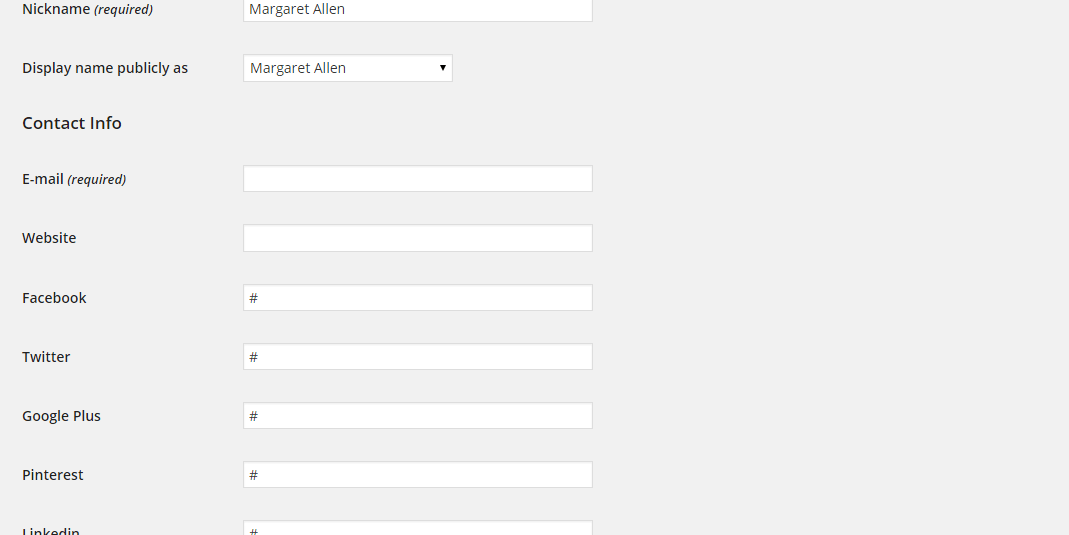
To add a new author and information that will be visible on the front, follow this steps:
- Navigate to: Users → Add New
- Name: Select "Author" in "Role" dropdown and select desired name in "Display name publicly as" dropdown
- Contact Info: Type the website address
- About the user: Fill in the Biographical Info
- Social Profiles: Fill all the desired fields with the socical profile username.
09. Theme Options
The Theme Options Panel helps you easily take control over your site, by allowing you to upload your logo and favicon, style the appearance of the theme with your custom colors, change fonts, turn features on and off, paste custom CSS and JS code, paste the Analytcs code without having to write any code.
To access the Theme Options panel, navigate to Dashboard → Theme Options.
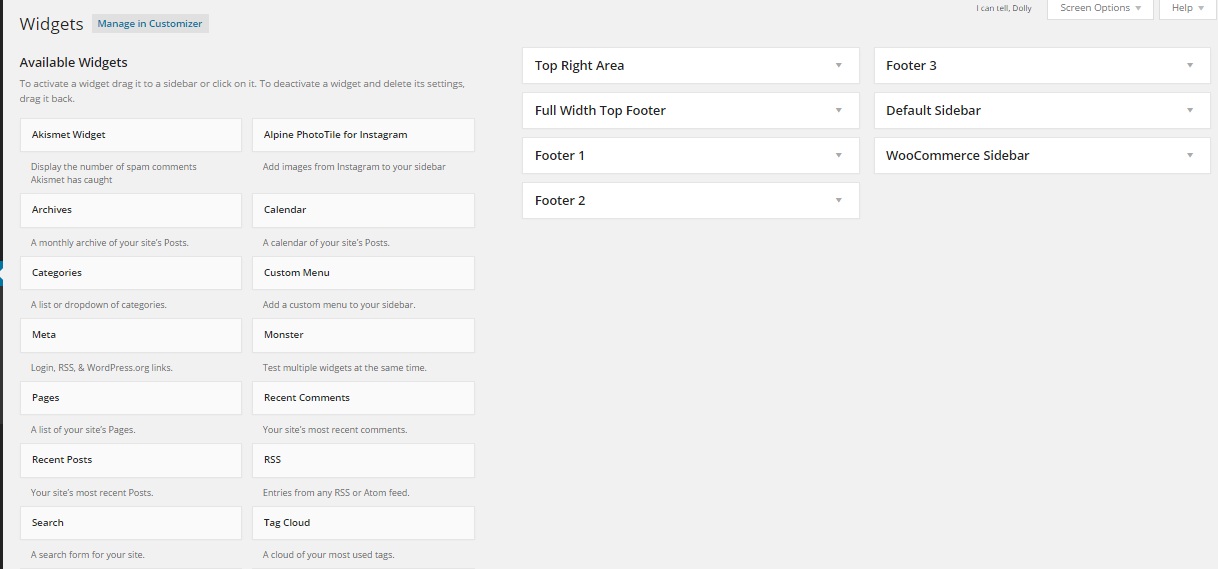
10. Sidebars & Widgets
Sidebars
The theme comes with 5 Sidebar areas:
- Top Right Sidebar - display login widget
- Default Sidebar - all posts, single post page, categories and archives
- Full Width Top Footer - this area use for display instargam gird images or custom html widget
- Footer 1, Footer 2, Footer 3 - three areas footer.
Multi sidebar
The Theme also support Multi sidebar. to create new sidebar:
- go to Theme Options -> Sidebar
- Custom Multi sidebar click "Create Sidebar"
Widgets
The theme comes with 9 custom widgets:
- About US Widget - Add info about your site, add a small varriation of your logo (Upload the image in Media section of the admin, copy the URL of the image and paste it in the Logo field in the widget), enter your social in themes options
- Ads Box - Show ads.
- Module Posts - display Posts, support multi filter, this module have 3 layouts.
- Flickr Widget -Display picture for flickr account.
- Social Counter Widget - Display follower number of social media.
- Twitter Widget - Display posts for twitter.
- Social Top Right - Display social icon at right top bar.
10. Customization
There are two ways to customize the theme without changing it's core files.
1. Theme Options Panel Custom CSS box
To style the theme with custom CSS, navigate to Appearence → Theme Options and click on the "Css code" tab. The first text box "Custom CSS" is where you can wright your own CSS code.
2. Use child theme
install child theme, then active it. now, you can write your css into style.css of child theme
2. Use custom.css & custom.js
if you don't want child theme you can add your style into custom file of theme
- find custom folder in theme folder
- custom folder include 2 file: custom.css and custom.js, you can write your style here
11. translating theme
FMAGAZINE is able to be translated into any language. The process of translating the theme is a user responsibility. The following instructions are given as guidance...
Translate via 3rd party plugin
To translate your entire website, Please follow below steps:
- Tell WordPress what language to use. Visit "Options > General" and select your language
- Download the plugin: https://wordpress.org/plugins/loco-translate/
- Follow the instruction steps of the plugin, create a .PO file and translate what text you wish.
- Open wp-config.php and replace this:
define ('WPLANG', '');with this (subsitute the language string (bg_BG) with your own!):define ('WPLANG', 'bg_BG'); - Download and install POEDIT
- Connect to your site -> open your theme/languages directory
- Look for the default.po file in theme package and open it with POEDIT.
- Translate file and save it as bg_BG (the file name must match with the string you inserted into wp-config.php)
- Two files will be generated after save. bg_BG.po and bg_BG.mo
- Upload the .mo and .po files into wp-content/themes/your-theme/languages folder
12. Updating theme
This theme may be updated periodically in order to add new features and fix bugs. When a new update be available an update message will appears on your WordPress dashboard . As a customer, you can download the most current version from your ThemeForest account..
Updating Automatically Via Envato Market
Envato has developed the Envato Market Plugin for WordPress. You can use this to receive notification of updates to themes purchased from ThemeForest and to automatically update (upon clicking) directly from within your WordPress admin area.
- After installation, click on active this plugin.
- Click the new Envato Market link in the menu and follow the instructions to configure the plugin.
Updating Manually
- Download the most current version from ThemeForest in the "Downloads" area of your account.
- Unzip the package and locate fmgazine.zip in the theme folder.
- find and unzip fmagazine.zip
- Connect to your site via FTP
- Upload the lavender folder you unzipped to wp-content/themes
- You should be asked to confirm overwriting of this folder and its contents. Confirm the overwrite.